|
|
| Maths intro HyperView intro |
|
|
||
Introduction to the Program |
||
|
Installation: The program can be downloaded here as a *.tar.gz archive. There will be no
configure script before the first "official" release (which means the
main features), so be sure to adapt the Makefile to your system
configuration. The program makes use of the
gtkmm (version 1.2.8) and
gtkglarea (version 1.1.1-6)
packages, which thus need to be properly installed before
compiling.
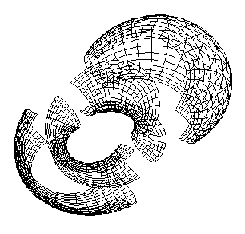
Using the program: If everything worked well during the installation, HyperView can be started from within the main directory by typing "./HyperView" (surprise, surprise!). This opens the main window (screenshot), which is initially empty. The user can now add cyclides via the "Add new torus" button. A click on this button opens a modal window (screenshot) where the properties of the cyclide to be added can be specified. We have to keep in mind that such a cyclide emerges as the stereographic projection of a specific subset of the hypersphere (which I call a hypersubset). These hypersubsets are obtained as the preimages of circles on S2 (called 2-circles) under the Hopf map. Thus all the essential information concerning the shape of the cyclide is contained in this 2-circle. A circle on S2 can be described as the intersection of S2 with a suitable plane, which in turn is determined by its normal vector and its distance from the origin. These parameters are entered in the upper part of the window. The normal vector can either be given by its coordinates (it is automatically normalized to length 1) or by its "polar coordinates", the angle it encloses with the x,y-plane (called beta) and the angle its projetction into the x,y-plane encloses with the x-axis (called alpha). Furthermore, the distance from the origin to the plane is asked for (measured in the direction of the normal vector; if the vector is flipped around, the sign of the distance changes). I would very much like to implement the possibility of specifying this plane interactively (by mouse, maybe in a separate window), but I fear this has to be postponed for an indefinite time). In the lower parts of the window the visual appearance of the cyclide can be customized (for examples of how they look like see the screenshots section): "Circles" is the first and in my opinion still the most beatiful display method. As mentioned above, the cyclide is the projection of the preimage of a 2-circle. The "Circles" display method does the following: It calculates a number of equally distributed points on the given 2-circle (this number is given by the value of "slicing") and projects their preimages under the Hopf map (which are circles in R4) into R3. The result is a family of circles that are all contained in the surface of the cyclide. By chosing "Circles" as the display method this family of circles is drawn, which yields sort of a skeleton of the cyclide. Thanks to the inherent properties of the Hopf map and stereographic projection, the resulting pictures are rather fascinating since all of the circles are pairwise linked and the cyclides appear as oddly distorted tori. "Foliated" does the same as the "Circles" method, but it additionally connects some of the circles so that strips seem to be cut out of the cyclide's surface. I still have to figure out the best way to do this. At the moment, this is done by simply linearly interpolating between two consecutive circles. This has the disadvantage that the strips do not exactly follow the actual cyclide's surface, but it is a good approximation and yields acceptable images.
"Solid" is almost the same as "Grid", but the surface grid is filled as well yielding a solid surface. As soon as some cyclides are created, they can be individually selected via the ComboBox to the left of the button reading "parameter window" (up to now it only displays something like "Torus No. 42"; maybe I could add the possibility give individual names to the cyclides during their creation). If a specific cyclide has been selected, its properties can be displayed and changed in the parameter window which is opened (and closed again) by pressing the corresponding button. I believe the "delete torus" button should be self-explainatory. The view can be adjusted using the mouse. Left-clicking and right-clicking combined with dragging results in various kinds of roation. The easiest way to get used to it is by trial and error. The two graphical buttons on the upper left of the HyperSphere main window provide more detailed control (the scene can also be moved and the light source can be positioned). The mouse control is part of the C++ class GenericViewer which was developed as part of the QuatFract project by Tobias Dyckerhoff and David Reichert. Further information can be found in their documentation. With this introductory explanations the reader/user should have no trouble experimenting with the software. Have fun. |
||
|
|
![]()
© 2003 by Maximilian Albert • Anhalter42@gmx.de