What this is
a beginners' practical by me, Michael Pronkin, with kind supervision by Dr. Susanne Krömker. This practical focuses on an effect often observed on special stickers for kids or postcards where the image changes based on the viewing angle. These mediums often contain just a few different images and are sometimes used to make it seem as though the picture moves by doing something similar to stop motion animation. For this practical I was presented with a very special case of this effect. On a certain high quality packaging of a champagne a silver ball, like a christmas ornament, was depicted in the middle and no matter what angle I looked at it, it seemed to stay centered, almost as if the box was translucent and the ball was inside. This practical is about my attempt at achieving this effect inside the rendering engine I wrote for my advanced practical previously.
About conventional lenticular lenses
Lenticular Lenses are an array of magnifying lenses on a surface arranged in such a way that depending on the viewing angle, different images can be portrayed. Commonly used in postcards using a technique called lenticular printing, this effect is used to create an illusion of depth, movement or to display multiple images on a single medium. In the case of the packaging used in this practical, it is used in a very fine print to achieve a smooth 3D illusion.
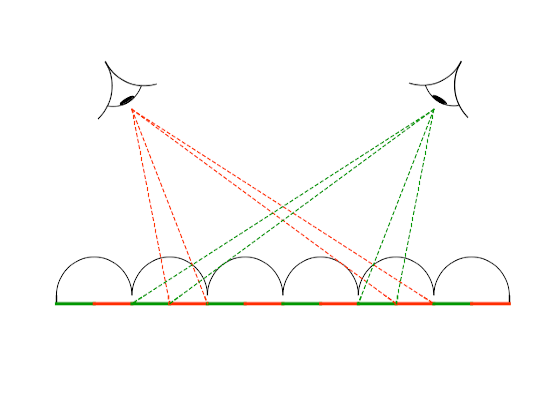
Assuming there are two images, marked as green and red here, a view from the left will produce more of the red image due to the lenses not changing the light's path if the incidence is perpendicular to the lens' surface normal. Similarly this will produce the image of the green marked area if the viewing direction is from the right. The dashed lines indicate examples of possible rays cast from the viewer's perspective.
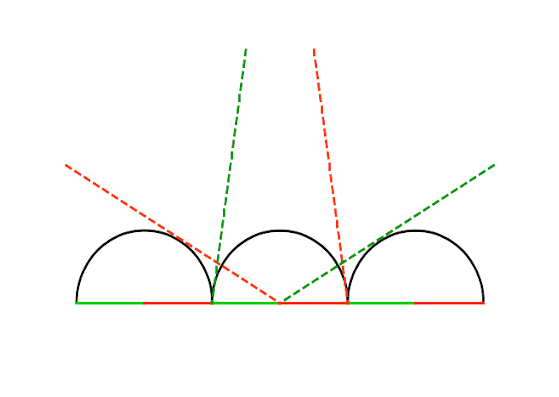
In this image, we trace the the area that the green and red markings can be seen from as it is illustrated by the dashed lines. Both areas have their center facing left and right respectively with the intersection providing a mixed view of both, as there is a certain area where in a real world case both images can be seen simultaneously in what looks like a linear interpolation of the two. Moving to either side then slowly fades out the less visible image.
How does the packaging achieve this?
Technically the packaging has two separate interesting effects: The spherical reflection and the seemingly unmoving center part no matter the viewing angle. A spherical reflection in itself is not achieved by using lenticular lenses but provides a pleasant confusion in the viewer as it obfuscates the simplicity of the other component and as such lends itself well to provide a convincing illusion.
Spherical reflection
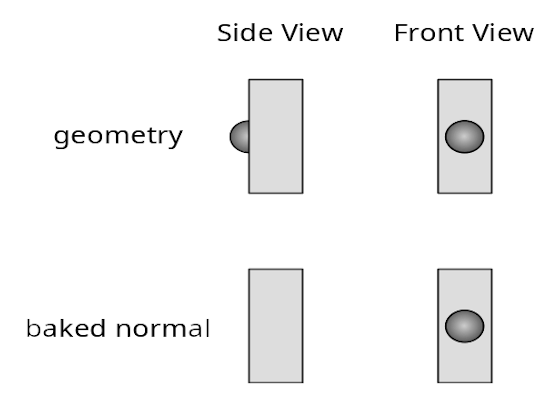
In computer graphics the direction light reflects is determined by its normal and as such creating a spherical reflection effect on a flat surface can be easily achieved by using a normal map. A normal map provides the ability to give a surface a different reflection angle than it's geometric shape would otherwise provide. Thus, using the normals of a hemisphere placed in the center gives the impression of a protruding sphere or, by adjusting the surrounding normals to give some depth, an internal sphere.
Viewing angle changes
In order to give the impression that a spherical object is stational inside a cubic object, the texture portraying the inside needs to scale and move in the opposing direction of what the natural effect of looking at it from a more sideways perspective does. Using the camera's viewing direction vector and the cube's normal at any given position can provide a value that corresponds to its degree of visual skew. This skew can then inversely affect a mixture of scaling and translation of the UV coordinates to make the texture's center stay in the camera's visual center of the box object. This effect, due to the use of texture mapping based on viewing vector incidence, is very similar to lenticular lenses. And because the sphere only moves sideways it is even similar to the most common use where lenticular lenses are cylindrical and only change the image from one axis of rotation. when this method is applied to all sides, it produces the desired illusion of a sphere resting inside a seemingly opaque box.
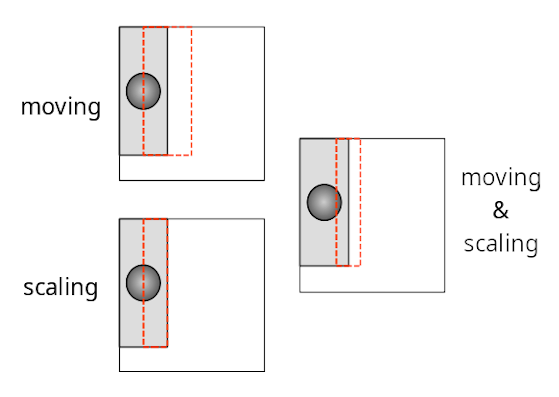
Here you can see the difference that moving, scaling and both have on the UV coordinate projection that achieves the desired effect. Moving translates, scaling multiplies.
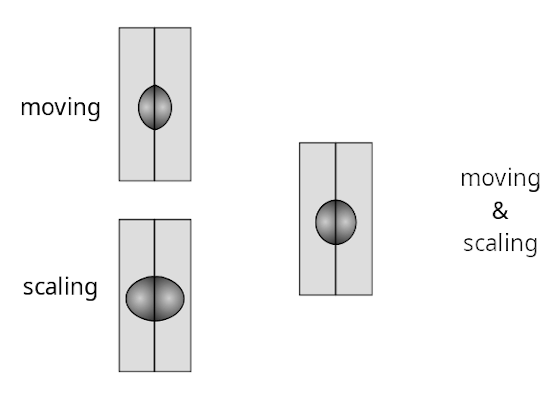
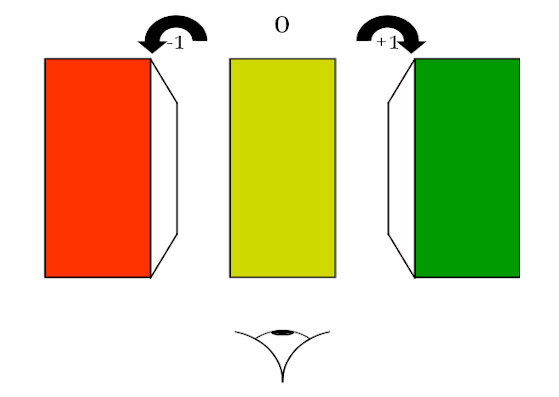
This is what the operations approximately look like when the box is viewed at from the corner. Moving alone produces cutoffs that make the sphere look thinner, scaling alone keeps the distance from the sphere's edge to the visual silhouette of the box equal, although it should be proportionally smaller such that the sphere stays round. Therefore it makes it look thicker. An application of both operations with a ratio that keeps the sphere round, achieved by preserving horizontal proportions the same, gives the best results. The sphere's radius and distance from the visual silhoutte's edge needs to be adjusted for in moving and scaling and can be calculated from distance data taken from the textures.
Overlay Textures
An additional task in this practical was to fully recreate the box with its conventional text and decoration that is unaffected by the 3D illusion behind it. For this purpose I created a separate set of textures needed for Physically Based Rendering and applied either the lenticular UV mapping and textures or the overlay based on the alpha channel in one of the texture maps. This creates a part of the model that is unaffected and can be used to display any fixed image such as the text and a part that follows the rules described in this documentation to create an illusion of an unmoving sphere regardless of viewing angle.
click through the buttons to see the labeled effect
Demo
Here are a few snapshots made in the rendering engine.
click through the buttons to see the labeled effect
click through the buttons to see the labeled effect
Sources
About
This is a beginners' practical supervised by Dr. Susanne Krömker at Heidelberg University done by
Michael Pronkin
BSc applied computer science